Skip to content

Serialino-PCB
Serialino - PCB

We talk again of Serialino, our Arduino's clone: this time the printed circuit board (PCB) design is shown.
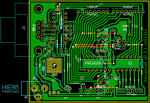
Here beside you find a screen-shot of the PCB of Serialino, numbered 1.0.

Even from here you should be able to distinguish the areas described in the previous post.

Power supply section on the bottom-left; the communication port and IC Max232 on the top-left; the headers on top and bottom; and finally ATMega with external oscillator, then the switch button and the ICSP pin headers.
...continue reading "Serialino – The PCB"

Serialino-top
Serialino - Top

Last time we talked about the importance of prototyping, when you decide to develop an idea involving electronics; this is worth especially if everything is direct to get the final result into a copper board.

The better the prototyping, the more efficient the copper board.

You know that the signal's integrity on breadboard is affected but multiple sources of noise: the capacitances and resistances due to the internal paths are just a little example, being negligible for standard circuits in DC or low frequencies power supplying.


Nonetheless you may want to know about it.

...continue reading "Serialino – Presentation"

Arduino-breadboard1
Arduino on breadboard - 1

Why should we build an Arduino platform on breadboard?
A simple answer is: why not?
This is far away to be an idiot answer, because sometimes people wants to take account into electronics but doesn't know where to start from.

Differently from a pure theoretic book, the practice is a continuous discover of our potentialities.
Very few people has the ability to see in mind what a theory can onto the matter, while the opposite path is more widely available.

The strength of a good practical spirit is the ability to better understand the theory!

So... why not?

...continue reading "Constructing an arduino on a breadboard"

Reed switch

A magnetic reed switch is a switch that change it's state whenever a magnetic field is present.
Magnetic reeds are cheap and really easy to find online.
They have a lot of practical uses like checking if a window/door is open or not.
We will use them in our A-H-A project.
There are two options of these magnetic switches.
The N.O. (normally open) and the N.C. (Normally Closed) ones.
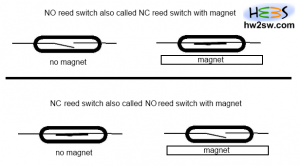
Normally Closed (NC) is a reed switch that the current passes when the magnet is not present.
The same type of reed is also called Normally Open with magnet.
On the other hand a reed switch is called NO, when without the presence of a magnetic field the current does not pass (open circuit).
The same type of reed switch can be also called Normally Closed with magnet.
In alarms it is most common to use a NO or alternatively called NC with magnet reed switch since the alarm when is broken or being cut by thieves then the circuit results open/broken even if the magnet (door) is in place.

Reed Switches
Reed Switches

That's why most residential alarm systems use NO or alternatively called NC with magnet reed switches.
More about reed switched will be discussed in other theoretical articles. If you are interested you can visit the dedicated wikipedia page.
Let's find out how we can connect this switch into an arduino board.

...continue reading "Connecting a magnetic reed door switch into arduino"

AHA Project RFID Part 2

In this tutorial we will see how we can recognize persons using our RFID reader.
Two LEDs will be added at the project in order to get some better user experience.
A "security line" will be also added. The concept of the "security line" is pretty simple.
If the line get's 5V (is HIGH) then arduino knows that the RFID reader is working correctly otherwise the RFID reader is broken (or the communication between arduino - RFID reader).
As always we will make an "object based" approach.
From the first article of RFID we can find the TAG IDs.
...continue reading "Connecting 125Khz RFID module to arduino – Part 2"