Skip to content

Reed switch

A magnetic reed switch is a switch that change it's state whenever a magnetic field is present.
Magnetic reeds are cheap and really easy to find online.
They have a lot of practical uses like checking if a window/door is open or not.
We will use them in our A-H-A project.
There are two options of these magnetic switches.
The N.O. (normally open) and the N.C. (Normally Closed) ones.
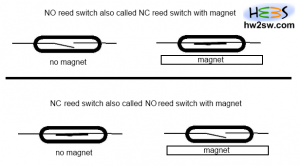
Normally Closed (NC) is a reed switch that the current passes when the magnet is not present.
The same type of reed is also called Normally Open with magnet.
On the other hand a reed switch is called NO, when without the presence of a magnetic field the current does not pass (open circuit).
The same type of reed switch can be also called Normally Closed with magnet.
In alarms it is most common to use a NO or alternatively called NC with magnet reed switch since the alarm when is broken or being cut by thieves then the circuit results open/broken even if the magnet (door) is in place.
Reed Switches
Reed Switches

That's why most residential alarm systems use NO or alternatively called NC with magnet reed switches.
More about reed switched will be discussed in other theoretical articles. If you are interested you can visit the dedicated wikipedia page.
Let's find out how we can connect this switch into an arduino board.

...continue reading "Connecting a magnetic reed door switch into arduino"

Connecting arduino with an external programmer

In this quick tutorial we will see how to program our arduino board with the help of an external programmer and not by using the arduino bootloader.
Before proceeding with this tutorial take a look at the "burn arduino with usb tiny" tutorial.
The first thing you have to understand is that by uploading a program with an external programmer you are going to lose your already burned bootloader on your ATMEGA chip.
So before proceeding make sure you can bootload your chips using your external programmer.

...continue reading "Programming arduino with an external programmer"

A-H-A-Project-RFID

In this tutorial we will see how we can connect a RDIF reader into arduino.
We are going to use a 125 Khz RFID module  that can be bought from seeedstudio.
Some 125 Khz tags are also needed. We bought them from ebay but you can also find them on other online shops.
This guide is the first of a series of articles.
Starting from this article we are going to construct from scratch a home alarm based on arduino duemillanove.
Since the project is big we are not going to see a lot of details of each part / sensor.
In the future we will try to cover the theoretical gap.
These series of tutorials will be easy to understand and will help you to construct step by step the "A-H-A" (Arduino Home Alarm) project.

...continue reading "Connecting 125Khz RFID module to arduino – Part 1"

Circular Menus Redux

Seems like the old circular menu class is now incompatible with the new Arduino 1.0 GUI version.
Rober Wagner from the arduino forum described the incompatibility. He also sent to us an email and we thank him for the contribution.
The circular menu seems to interest a lot of people so we decided to "port" the circular menu class into the new Arduino 1.0 GUI.
We will try to describe the class in the future.
Now before starting have a look at the documentation of the "old circular menu".
As always you have to construct the three button configuration on your breadboard.
The down button is on digital port 7 the right button on digital port 6 and the enter button at digital port 5.
In order to find out how to connect buttons on your arduino please read the "arduino and memory how to" tutorial.

...continue reading "Circular menu in arduino redux"

Liquid Filler 3D

We have already seen till now how we have constructed our project in PCB .
Liquid filler at this point needs calibration.
In this article we will discuss the calibration method.
The first step is to dimension correctly the RG resistor.
From the weight sensors article we already know that :
a) For a 1Kg load cell we are going to need Gain=1,07421875/0,005473=196 for a 1.1V arduino reference analogReference(INTERNAL); So we need a Rg=312 Ohm.

b) For a 20Kg load cell we need a Gain =  3925 for a 1.1V arduino reference analogReference(INTERNAL);
So we need a Rg=15 Ohm.

...continue reading "Liquid Filling Machine – Liquid Filler Part 4"