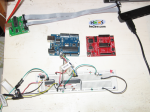
By referencing again to the picture, you'll see that the number of electronic components on bb are numerically less than the ones on Arduino; nonetheless it perfectly works as another Arduino, with an ATMega 328 on (and with relative bootloader).
Yes: a less expensive working platform, easy to manage and change according to your needs!
Just consider this: the device for USB to Serial (and vice-versa) communication on Arduino is an FTDI, which considerably costs if bought singularly.
We can operate directly with classical serial signals sacrificing the FTDI device, with the Serial DB9 ports: and if you cannot totally renounce the USB port, converter cables exists for the aim from serial to USB.
Well... while the test phase is so important, it has some limitations when you begin to think to a final product: we won't describe anything about signal's integrity or space optimization.
We concentrate onto the possibility to transform the personal job on bb to a shareable/saleable board, which intrinsically improves the signal's purity and requires space's optimization.
So we can summarize the present discussion with three points:
- prototyping (realize your idea onto bb, better if supported by theory)
- test on bb
- realization on copper boards (which requires some other tests)
The third point hasn't been treated until now, and here we just indicates it as a natural conclusion for the two previous ones.
But don't worry about that, because this is an introduction to the path we have shown listed.
Specifically in this article, the idea is to become able to build our homemade Arduino platform: the versatility of the breadboard push us to understand the basic project design of Arduino (here the Duemilanove and similar), even and above all by making errors.
Yes... sometimes errors costs the integrity of components, but again: the breaking of a single device on bb is less traumatic and less expensive that the one on a final copper board.

To have a taste of what we'll see together, you can see beside the picture of a electrical schematics (made with KiCAD).
We have all the basic components necessary to construct an Arduino, all conceptually separated to reflect the main parts of the board.
We'll start form this scheme to perform the realization of an Arduino board on copper.
See you on next article.
Thanks!