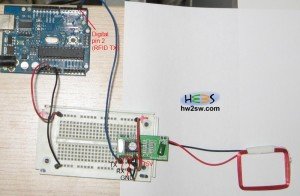
Below we can clearly see the connection between arduino and the RFID reader.

Notice that the RX pin and the 3rd pin are not connected.
It is basically a three wire connection (+5V , GND, TX).
It is program time !
It is a good practice to document your code.
So first of all we talk about the TAG ID format .
For us the TAG ID is the 12 byte code ( 10 ascii + 2 checksum chars).
We ignore the first (0x02) and last byte (0x03)
In order to communicate with the RFID reader we use the SoftwareSerial library.
The "SoftwareSerial" library has been developed to allow serial communication on other digital pins of the Arduino, using software to replicate the functionality.
We use RFID RX pin = 255 since we do not need it :
SoftwareSerial RFID(RFID_TX_Pin , 255);
The code is pretty self explanatory since it is well commented.
Take your time in order to understand this example.
//Made By TrustFm for http://www.Hw2Sw.com

//Documentation :
//The TAG ID has this format :
// HEX :        2 | 30 31 30 30 34 45 32 37 31 37 | 37 46                          | 3 -> Total 14 bytes (chars)
// Start byte : 2 |   10 ascii chars (10 bytes)   | 2 ascii chars (bytes) checksum | End byte : 3
// We DEFINE the TAG ID as the 10 ascii chars + 2 ascii chars of the checksum -> total 12 chars/bytes [we remove the start/end bytes]

#include <SoftwareSerial.h> //for serial communication on any digital pins.
                            //More info : http://arduino.cc/en/Reference/SoftwareSerial

//RFID ...
const int RFID_TX_Pin = 2;  // the TX pin that the RDIF Sensor is attached
String Parsed_Tag_ID, Stored_Tag_ID;
char c;
SoftwareSerial RFID(RFID_TX_Pin , 255);  // RX, TX for serial communication on any digital pins.
                                         // RX port : 2 -- TX port : 255 (do not need any TX port)

////////////////////////////////////////////////////////////////////////////
//AUX FUNCTIONS BEGIN
boolean CheckSum_Tag_ID(String Tag_ID) {
  boolean res = false;
  unsigned int b1,b2,b3,b4,b5,checksum;

  //Convert Tag_ID String into array of chars in order to use sscanf
  char charBuf[13];
  Tag_ID.toCharArray(charBuf, 13);
  sscanf(charBuf , "%2x%2x%2x%2x%2x%2x", &b1, &b2, &b3, &b4, &b5, &checksum);

  //Control now the TAG ID
  if ( (b1 ^ b2 ^ b3 ^ b4 ^ b5) == checksum ) {
    return true;
  } else {
    Serial.println("Tag ID is INVALID");
    return false;
  }
}
//AUX FUNCTIONS END
////////////////////////////////////////////////////////////////////////////

////////////////////////////////////////////////////////////////////////////
//The setup BEGIN
void setup()
{
  //Setup serial
  Serial.begin(9600);

  //Setup RFID serial
  RFID.begin(9600);
}
//The setup END
///////////////////////////////////////////////////////////////////////////

///////////////////////////////////////////////////////////////////////////
//The main LOOP BEGIN
void loop(){

  Stored_Tag_ID="";

  //Read the RFID TAG BEGIN
  RFID.listen(); //Enables the selected software serial port to listen.
                 //Only one software serial port can listen at a time; data that arrives for other ports will be discarded.
                 //Any data already received is discarded during the call to listen() (unless the given instance is already listening).
  if ( RFID.isListening() ) { //Tests to see if requested software serial port is actively listening.
    while( RFID.available() > 0 ){ //Get the number of bytes (characters) available for reading from a software serial port.
                                   //This is data that's already arrived and stored in the serial receive buffer.
      c=RFID.read(); //Reads one char/byte at a time
      Parsed_Tag_ID += c; //Store the char into the Parsed_Tag_ID string
      if ( Parsed_Tag_ID.length() == 14 ) { //The TAG ID has 14 chars in total
        if ( (Parsed_Tag_ID[0]==2) && (Parsed_Tag_ID[13]==3) ) { //If the first char is 2 and the last one is 3 then ...
          Parsed_Tag_ID = Parsed_Tag_ID.substring(1,13); //Delete the 1st and the 13th (last) char
          if ( CheckSum_Tag_ID(Parsed_Tag_ID) == true ) { //Validate the Parsed Tag Id
            Stored_Tag_ID=Parsed_Tag_ID;
          }
        }
        Parsed_Tag_ID="";
      }//end i have read the 14 chars
    }
  }
  //Read the RFID TAG END

  //Print & use the Stored Tag ID ...
  if ( Stored_Tag_ID!="" ){
    Serial.println("Captured Tag ID : '" +  Stored_Tag_ID + "'");
  }

}

//The main LOOP END
///////////////////////////////////////////////////////////////////////////
The code can be downloaded from here: RDIF_Example_Simple
Notice how we used the official documentation offered from seeedstudio in order to generate our code.
Below is the video demonstration :
In the next article we are going to expand the "RFID Example simple".
We are going to add "Authorized persons" , add some LEDs and a security line in order to check that our alarm works.