It is time to calibrate the device.
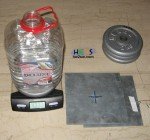
To do this you need a digital scale and a big container.
Position the container at the digital scale and decide a weight step. For a 1Kg load cell a 100gr step is ok (so you will do 10 measurements). For a 20Kg we decided a 250gr step (8,5Kg that we needed / 0,25 Kg per step = 34 measurements).
Fill the container with your weight step and then place it to the weight board of the liquid filler.
Read the weight analog value from the LCD and write it down to a paper. Keep doing this for all the range you want.

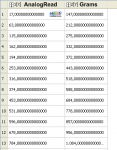
Below you can see the 1Kg table with the analog readings

Notice that in Autofill mode these readings change a little bit. This is caused by the valve's current absorption.
It is always good to make again the measurements with the valve attached in autofill mode (opened valve) with the valve attached.

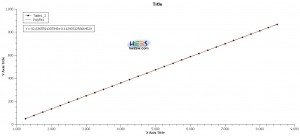
With the help of SciDAVis we can plot the graphs


Scidavis give us the linear formula :
y=133,9982+1,2134*x where in this case x is analog read and y is grams
in the normal case
Below are both plots in one diagram :


Notice that both curves have an average 4 point of difference.
All SciDAVis diagrams for the 1Kg load cell can be downloaded from here : SciDAVis-LoadCell-1Kg
In 20Kg load cell case we do exactly the same procedure.
Below is located the "normal" calibration table

The graph this time is :

In this case after testings the autofill curve had a 60 points of difference.
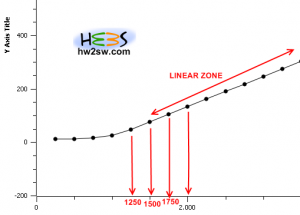
Notice that if you get a graph not linear then you should focus in its linear zone. In the case of the 20Kg load cell for example we had a coplete graph like this :

So as you can see we have selected the part from 1250gr and up in oirder to calculate our formula.
This time the formula is : y=-92,6365 + 0,1129*x where this time y is analog read and x is the grams.
The 20Kg load cell SciDAVis files can be found here : SciDAVis-LoadCell-20Kg
Knowing the conversion formula we are able to re-program our ATMEGA with the help of arduino board.