Step 2) Toner transferring
Measure your printed paper with the toner and using scissors again cut your copper clad.
Yes the copper clad can be cut with scissors !


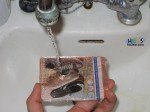
Now it is time to clean the copper clad with the kitchen scrub, liquid soap and some water like the photo below.

The final result should look like this :

Notice that the copper should not be reflective and shiny but clean and opaque.
From now on touch the copper only at the edges.
Now we preheat our laminator (i am using a modified United Office ULG 300 A3) until it reaches it's temperature. In most cases a green light should light up. (OK state).
Wear gloves or use a towel since the copper will heat up.
If your laminator gives micron choices select "80 micron" paper for more pressure.
Now put the toner paper over the clean copper clad so that the toner touches (faces) the copper.
Press with your fingers the copper clad with the toner paper and pass it from the laminator at least 20 times (in my laminator 20 times are needed in other laminators 10 times are ok).
After passing it a couple of times you will notice that the copper clad and the paper are somehow "glued".
While doing the toner transfer you can not stop in the half. Pass it 10-20 times uninterrupted.
Keep changing edge is also a good thing to do
Video demonstration below
The final result :

Now let pass 1 minute in order to cool the heated copper.
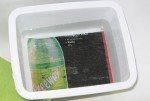
Now put the copper clad into a plastic container with some water in your bathroom for 1 minute.
By pressing down and out the paper will be removed and the toner will remain in the copper !
Do not use force doing this procedure. The paper will soak the water and will go off too easily.
By forcing you risk to remove the toner from the copper too.
Do not use any soap or kitchen scrub at this procedure just water and rub with your fingers.

If you are lucky you will get a result without any problems at all like the picture below :

If you have toner gaps you can correct them with a narrow black permanent marker or you can clear all the border using the kitchen scrub and the liquid soap and retry again.
If you have not transferred toner parts means that :
- The printer didn't printed well the circuit on the paper
- The copper wasn't clean in that particular region
- The toner did not heated in that region
If you are sure about your printer and your clean copper then you should pass more times the copper from the laminator or you need to hack your laminator in order to give more heat.
If your toner looks burnt into the copper (you will notice that no holes are on the pads) then you need to pass the copper less times from the laminator.
Revision optically your board.
If you are happy with the result and the board is dry you can go to the next step ...


Pingback: Printer Upgrade Kit (Sharp AL11PK) (COPIERACC AL11PK) | PRINTER REVIEWS